I was attending a craft fair earlier this month, and I needed to make a variety of items at reasonable prices. HOWEVER, the market needed a raffle item valued at $25+, and none of my items were priced that high. My items were all smaller plushies priced with kids in mind. So I began searching some crochet groups on Facebook to try and get some ideas. I saw a really cool snake pattern that everyone was commenting on. When I initially attempted the pattern, I found it was just WAY to big for the blanket yarn, and while I needed a larger finished product, I didn't want one THAT large. So I went to work trying different possibilities to make a smaller, BABY snake. Then I needed to decide on color combinations... and I decided to make this one more realistic! I looked up a ton of different snake color combinations to find one that would look amazing in crochet, and I found one- the KING SNAKE!
Showing posts with label animals. Show all posts
Monday, January 9, 2023
Tuesday, August 13, 2019
Custom Order - Crochet Chicken
Occasionally I'll post in my local Mom's group that I crochet, and I invite them to like my Instagram or join my facebook page. I post with the hope that I'll get more followers, not custom orders.
I find that custom orders can be tricky, if the client is very specific about what they want, color demands, or specific pattern requirements.... and usually they want to pay pennies for my time put into the project.
Well, last month I did my usual "check me out!" post and I got a private message with a custom order request. The request was simple, she wanted a crochet chicken to give as a gift. She shared a free pattern on Pinterest that she liked, and I quoted a fair price for the materials and time it would take to make it. At this point, I'm kind of holding my breath because I'm expecting hostile negotiations about to begin....But she gladly accepted my price and while I couldn't start right away, I was excited and happy to work on this project for her. And I think it turned out lovely!
*Disclosure: This post may contain affiliate links. If you purchase an item through one of the links on this site, I may receive a small percentage of that sale at no additional cost to you. See my full disclosure policy.Thank you for helping support this blog!
I started out by working on the various appendages. They're smaller and work up faster. It's easier to squeeze in those pieces when I need a break from my other projects. I wanted to work up the body in one sitting, so the tension would be the same throughout the piece. So I started that one later.
I didn't want to stuff it the way it was with the fiber fill. The yarn we decided on (Lion Brand Hometown USA - White) was bulky so it left larger holes between stitches. I took some white fabric from my stash and sewed an insert in the appropriate shape, and put a little bead pouch at the bottom to help weigh it down. I was VERY PLEASED with the way it turned out!!!
Isn't she so cute! I probably should have made some little eggs to go with it! How cute would that have been?!
Happy Crocheting!
I find that custom orders can be tricky, if the client is very specific about what they want, color demands, or specific pattern requirements.... and usually they want to pay pennies for my time put into the project.
Well, last month I did my usual "check me out!" post and I got a private message with a custom order request. The request was simple, she wanted a crochet chicken to give as a gift. She shared a free pattern on Pinterest that she liked, and I quoted a fair price for the materials and time it would take to make it. At this point, I'm kind of holding my breath because I'm expecting hostile negotiations about to begin....But she gladly accepted my price and while I couldn't start right away, I was excited and happy to work on this project for her. And I think it turned out lovely!
*Disclosure: This post may contain affiliate links. If you purchase an item through one of the links on this site, I may receive a small percentage of that sale at no additional cost to you. See my full disclosure policy.Thank you for helping support this blog!
Link to pattern: https://www.ravelry.com/patterns/library/hen
I started out by working on the various appendages. They're smaller and work up faster. It's easier to squeeze in those pieces when I need a break from my other projects. I wanted to work up the body in one sitting, so the tension would be the same throughout the piece. So I started that one later.
I got all the pieces put together, and all that was left was the assembly!
I didn't want to stuff it the way it was with the fiber fill. The yarn we decided on (Lion Brand Hometown USA - White) was bulky so it left larger holes between stitches. I took some white fabric from my stash and sewed an insert in the appropriate shape, and put a little bead pouch at the bottom to help weigh it down. I was VERY PLEASED with the way it turned out!!!
Isn't she so cute! I probably should have made some little eggs to go with it! How cute would that have been?!
Happy Crocheting!
Labels:
animals,
Crochet,
Custom Order,
Pattern Review
Monday, May 6, 2019
Giraffe Print C2C Blanket - FREE GRAPH
This is the FINAL design in my ANIMAL PRINT C2C blanket series. I love Giraffes because I think they look like dinosaurs that made it out of the ice age! They are just sooooo cool looking! Now you can crochet yourself a Giraffe print blanket to love and snuggle!
Saturday, May 4, 2019
Tiger Print C2C Blanket - FREE GRAPH
This is the third design in my ANIMAL PRINT C2C blanket series. This design come from the majestic tiger! These creatures are so strong and fascinating. Their bold print is ever popular, and the colors just really pop, making a super fun blanket design.
Thursday, May 2, 2019
Zebra Print C2C Blanket - FREE GRAPH
This is the next design for my ANIMAL PRINT C2C blankets. This design comes from the lovely Zebra, one of Africa's favorite striped horses. I don't think you can do an animal print series without doing one on Zebras!
Tuesday, April 30, 2019
Leopard Print C2C Blanket - FREE GRAPH
This is the first in my ANIMAL PRINT C2C designs. I know there is a lot of controversy regarding the use of animal furs, so this is a great alternative to enjoying the beautiful animal prints in your home, cruelty free! This design comes from the beautiful Leopard, a fierce cat lives in Africa and some parts of Asia. If you're lucky, your local zoo might have one!
Thursday, December 1, 2016
Baby Octopus
This post goes along with my last post. I followed another Pinterest link to make another gift for my sister who is having a baby. She saw this post on Pinterest:
So, naturally, I wanted to make one really badly.
I underestimated the size of this thing. It's so big! The head is almost 5" round.
I asked my sister what color she wanted, and I suggested matching the blanket, so we matched it with the blanket that I made for her. Because the octopus used a single crochet stitches and the blanket used mostly double crochet stitches, the color looks surprisingly different!
But I still think it is super, super cute! Especially when he looks at you like this:
Tuesday, March 1, 2016
Springtime Butterflies
It's really starting to warm up here in Sunny San Diego! All my trees are starting to blossom, and all my seedlings are starting to sprout. I wanted to celebrate the springtime by making a few butterflies. There are SO MANY butterfly patterns (including my own), and I love trying out new patterns and, in general, creating beautiful things.
Here's the result!
They turned out so cute I had to make some in a bunch of spring colors! Didn't they turn out great!?
You can find the pattern here: http://www.crochetleaf.com/crochet-butterfly-pattern.html. Crochet Leaf provides not only the pattern but a lengthy tutorial to help you make the butterflies.
They're so cute, you should make a whole bunch to decorate for spring's arrival!
Monday, October 20, 2014
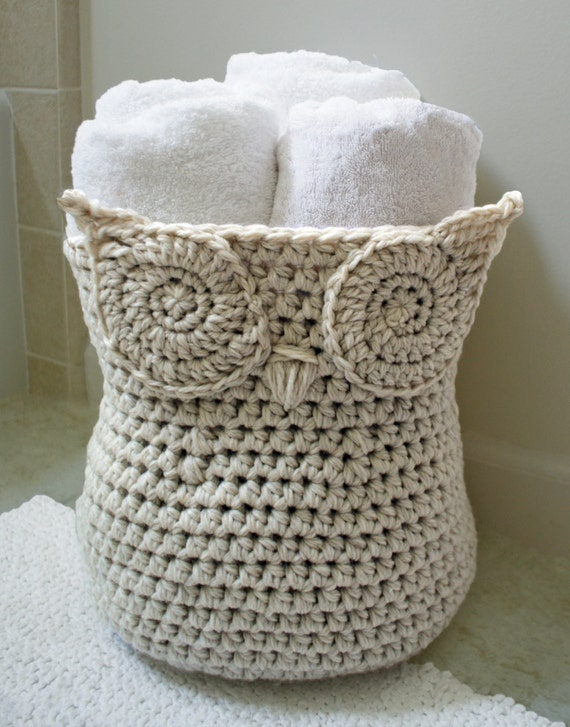
October Feature - Owls
Now, I know you saw the title and thought, "well, it's Halloween this month, so obviously she's talking about HALLOWEEN sorts of owls." Well, nope. I'm talking about the super cutesy trendy owls everyone loves. Guess what?! I love them too!

https://www.etsy.com/listing/156018281/crochet-pattern-owl-basket-crochet?ref=sr_gallery_31&ga_search_query=crochet&ga_search_type=all&ga_view_type=gallery

http://mojimojidesign.com/nesting-rainbow-owls/

https://www.etsy.com/listing/180233592/nursing-necklace-breastfeeding-necklace

https://www.etsy.com/listing/156018281/crochet-pattern-owl-basket-crochet?ref=sr_gallery_31&ga_search_query=crochet&ga_search_type=all&ga_view_type=gallery
http://mojimojidesign.com/nesting-rainbow-owls/

https://www.etsy.com/listing/180233592/nursing-necklace-breastfeeding-necklace
Wednesday, February 2, 2011
Monday, January 24, 2011
Monday, January 10, 2011
Friday, January 7, 2011
Sunday, November 21, 2010
Saturday, November 20, 2010
Saturday, October 16, 2010
Tuesday, October 5, 2010
Halloween Amigurumi Cat
This spooky little cat makes a cute holiday decoration, or even a toy for a little one.
This cat works out to be 4 inches tall (almost 4.5 with ears) in worsted weight yarn and size F hook.
Cat is worked in rounds. Make ears first!
EARS (make 2)
Ch 3, sc in 2nd ch from hk, hdc in 3rd ch from hk. Fasten off. Stitch to head before filling.
CAT
Row 1: Row 1: ch 4, sl st to form loop (6)
Row 2: 2 sc in each st (12)
Row 3: sc in each st around (12)
Row 4: 1 sc, 2 sc in next st, repeat around (18)
Row 5: sc in each st around (18)
Row 6: sc2tog, sc in next st, repeat around (12)
Row 7: sc2tog, sc in next st, repeat around (8)
Stitch in eyes (and other features as desired), stuff the head
Row 8: sc2tog 3 more times (5)
Row 9: 2 sc in each st (10)
Row 10: 1 sc, 2sc in next st, repeat around (15)
Row 11: sc in each st around (15)
Row 12: 2 sc, sc in next 2 sts, repeat around (18)
Row 13: sc in each st around (18)
Row 14: 2 sc, sc in next 5 sts, repeat around (21)
Row 15: sc in each st around (21)
Row 16: 2 sc, sc in next 6 sts, repeat around (24)
Row 17: sc in each st around, BACKLOOP (24)
Row 18: dc3tog around. fill body before doing last one.
Fasten off, use yarn to stitch remaining hole, and bring out the back and ch 12 to make tail.
Labels:
amigurumi,
animals,
Crochet,
free pattern,
holiday
Wednesday, September 8, 2010
Little Crochet Bird
Little birds are always cute. Here you can work one up in less than 10 minutes!
Bird:
Ch 4 and sl st to form ring.Row 1: ch 2, dc 14 into loop. sl st with top of ch 2
Row 2: ch 1, 2 sc in next 7 chs, (hdc, dc) in next ch, (tr, ch 3, sl st w/ 3rd ch from hook, ch 3) and sl st in next ch, sl st in next 2 ch, (sl st, ch 3, tr) in next ch, (2 tr, ch 3 and sl st with 3rd ch from hook, ch 2, sl st) in next ch.
Fasten off.
Part in RED is optional- it makes a beak the same color. You may instead, follow the instructions below to attach a different colored beak.
Wing:
Ch 4. 3 Tr in 4th ch from hook (forms loop), ch 3, sl st with 3rd ch from hook. Ch 3, sl st in loop.
Tighten strings and attach to bird. Wing is adjustable to look like it is flying, or resting!
Beak:
Attach string to bird's face. Ch 3, sl st in same ch. Fasten off.
Labels:
animals,
applique,
Crochet,
free pattern
Subscribe to:
Posts (Atom)