As a homeschooling family, we just a few online curriculum as we educate our children. As such, we have a pair of headphones for each kid! They used to break them fairly regularly, and so I finally started getting the more expensive bluetooth headphones to help prevent breakage. HOWEVER! I can't justify throwing away the headphones when the only problem with them is a split cord. You know... from each head phone ALLLL THE WAY to the jack? Do you know what I'm talking about? Look at the picture below....
My kids have done this to several pairs, and this was always my solution in the past:
Laugh all you want! But it worked! at least, it kept the cords together, not necessarily increased the longevity of the headphones. I feel like knotting the cord will weaken it over time and so when I looked at this sad pair of headphones I had an epiphany... I'LL CROCHET A COVER! and that will keep the two wires together!!!!!
Showing posts with label DIY. Show all posts
Monday, May 25, 2020
Thursday, November 2, 2017
Dressmaking with my Daughter
A few weeks ago I was getting some fabric at Joann's Fabric and Craft Store. They were having an amazing deal on quilting cotton fabrics and since I promised my daughter we would start quilting together, we went to go look at some fabrics.
As we were perusing through the aisles and different swatches of fabric, she found one that really caught her eye.
"Mom, I love this fabric. It would make a beautiful dress!"
Well, I had to get it for her! If she wanted to make a dress instead of a quilt, who am I to complain? It has been a while since I made a dress for my girls, so I figured we could put this one together.
We went to the pattern section to pick out a pattern. I knew that at home we only had patterns in smaller sizes, and she is about to turn 9. We flipped through the books and found out that Simplicity patterns were on sale for $.99! What great timing!!
We had picked out a couple but only one was in stock in the size we needed. So we picked that up, had our fabric cut, and went home!
First I cut out all of the pattern pieces and laid it out on the fabric. I had my daughter help trace the correct size onto the fabric, and she did most of the cutting.
I showed her how we follow the directions, starting with the stay stitching. We stitched all those pieces and started putting together the bodice. She kept getting SO excited as each piece was added and created a more finished look. I showed her how to iron everything flat.
Then, I put the sleeves on. Sleeves are one of those beasts that you just don't tackle at 8 years old. I had her watch me so she could see HOW it was done.
We started putting together the dress. I lined up the pieces and pinned them and she sewed them all together. She attached the dress to the bodice, but I had to do it one more time because her line was a little zig-zaggy. This line HAD to be straight.
We ironed the hem and I showed her how to do the first few feet. How you should hold your hands and help keep the fabric flat, how you should keep the stitches close to the edge so that it has a nice finished look. I was thoroughly impressed at how well she did this hem!
After that, all we had left was the zipper. I explained to her how that was done, and I sewed it in. After so much sewing experience, zippers don't scare me at all. I can even do it without the zipper foot and without pre-sewing the seam. I'm all about efficiency and speed!!
And this is how it all turned out! She was jumping and so excited to see how beautiful it turned out.
My daughter turns 9 this week and with how well this project went, I think we will be turning out more projects together! Do you enjoy crafting with your kids? Post a comment with a link to your projects!
As we were perusing through the aisles and different swatches of fabric, she found one that really caught her eye.
"Mom, I love this fabric. It would make a beautiful dress!"
Well, I had to get it for her! If she wanted to make a dress instead of a quilt, who am I to complain? It has been a while since I made a dress for my girls, so I figured we could put this one together.
We went to the pattern section to pick out a pattern. I knew that at home we only had patterns in smaller sizes, and she is about to turn 9. We flipped through the books and found out that Simplicity patterns were on sale for $.99! What great timing!!
We had picked out a couple but only one was in stock in the size we needed. So we picked that up, had our fabric cut, and went home!
First I cut out all of the pattern pieces and laid it out on the fabric. I had my daughter help trace the correct size onto the fabric, and she did most of the cutting.
I showed her how we follow the directions, starting with the stay stitching. We stitched all those pieces and started putting together the bodice. She kept getting SO excited as each piece was added and created a more finished look. I showed her how to iron everything flat.
Then, I put the sleeves on. Sleeves are one of those beasts that you just don't tackle at 8 years old. I had her watch me so she could see HOW it was done.
We started putting together the dress. I lined up the pieces and pinned them and she sewed them all together. She attached the dress to the bodice, but I had to do it one more time because her line was a little zig-zaggy. This line HAD to be straight.
We ironed the hem and I showed her how to do the first few feet. How you should hold your hands and help keep the fabric flat, how you should keep the stitches close to the edge so that it has a nice finished look. I was thoroughly impressed at how well she did this hem!
After that, all we had left was the zipper. I explained to her how that was done, and I sewed it in. After so much sewing experience, zippers don't scare me at all. I can even do it without the zipper foot and without pre-sewing the seam. I'm all about efficiency and speed!!
And this is how it all turned out! She was jumping and so excited to see how beautiful it turned out.
My daughter turns 9 this week and with how well this project went, I think we will be turning out more projects together! Do you enjoy crafting with your kids? Post a comment with a link to your projects!
Thursday, March 9, 2017
Crochet Feather Headpiece - Free Pattern
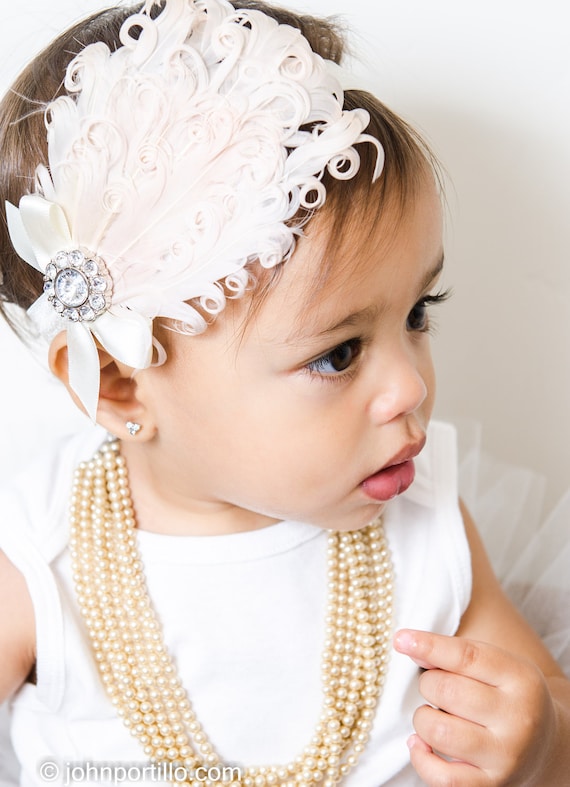
As many of you might have figured out, I'm a huge fan of Pinterest. I love all Pinteresting things! One of the things that I have loved are these beautiful feather headpieces that babies wear. I love the colors, the style and how adorable they look:


As you can see, these are SUPER SUPER cute, and I thought there had to be some cute replica crochet pattern for a nice, dainty feather looking applique, but... I could not find one! So I made up one after playing with several designs, and I decided to settle with a variation of the Irish Leaf traditional crochet pattern with some variations and some different options for sizes and "fluffiness".
This is the regular sized applique suited for children to adults depending on the style you're aiming for.
This is the large applique. This is to replicate the look of the photographs I found on Pinterest. I found a super cute medallion at Michael's Craft Store to embellish these headpieces.
This is the small applique. This was designed for newborns or young children.
In my design making, I created several options:
Small, Medium, Large sizes
Regular ends or extra fluffy ends
Materials:
Size G Hook (this is the set I use)
Worsted Weight Yarn (I use Caron’s Simply Soft Yarn: Pink, Robin's Egg, Ocean, White)
Yarn Needle
Scissors
Gauge:
Using G hook and materials listed the large feathers should measure approximately 5” tall and 2.5” wide, medium feathers should measure approximately 4” tall and 2.5” wide, small feathers should measure approximately 3” tall and 2” wide,
Here is the pattern for the different ends. Refer to these when you get to the part of the pattern where it says to complete turning end of choice [regular or extra fluffy]. If you find that this is a little too tricky, or are having trouble with this pattern, feel free to purchase my collection of tutorials for this feather headpiece on Etsy.
Regular Ends pattern: At the end of each row starting in row 2, complete the following to turn the work: ch 3, turn and work in back loops of the sc stitches.
Extra Fluffy Ends pattern: At the end of each row starting in row 2, complete the following to turn the work: ch 4, sl st in 2nd ch from hk, sc2tog in last two chs. Turn and work in back loops of the sc stitches.
Small Feather Applique:
Foundation chain: ch 6
Row 1: sc in 2nd ch from hk, 1 sc in next 3 sts, sc 4 in last ch, turn slightly to continue working on the bottom of the foundation chain, and sc in each st across.
Row 2: [Working in back loops only from this point forward] ch 3, and sc to the first sc on the opposite side of row 1, working clockwise, and sc in the next two sts. Complete turning end of choice [regular or extra fluffy], 1 sc in each sc across, and (1 sc, ch3, 1 sc) in the ch-3 sp, 1 sc in next 3 sc, complete turning end of choice [regular or extra fluffy], 1 sc in each sc back to the ch-3 sp. [one point on each side of feather completed]
Row 3: (1 sc, ch 3, 1 sc) in the ch-3 sp, 1 sc in next 3 sc, complete turning end of choice [regular or extra fluffy], 1 sc in each sc back to the ch-3 sp, (1 sc, ch 3, 1 sc) in the ch-3 sp, 1 sc in next 3 sc, complete turning end of choice [regular or extra fluffy], 1 sc in each sc back to the ch-3 sp.[two points on each side of feather completed]
Row 4-5: Repeat row 3 to create 4 points on each side of the feather to complete the applique. Finish off with a sc in the ch-3 sp, and fasten off. Weave in ends.
Medium Feather Applique:
Foundation chain: ch 8
Row 1: sc in 2nd ch from hk, 1 sc in next 5 sts, sc 4 in last ch, turn slightly to continue working on the bottom of the foundation chain, and sc in each st across.
Row 2: [Working in back loops only from this point forward] ch 3, and sc to the first sc on the opposite side of row 1, working clockwise, and sc in the next 4 sts. Complete turning end of choice [regular or extra fluffy], 1 sc in each sc across, and (1 sc, ch3, 1 sc) in the ch-3 sp, 1 sc in next 5 sc, complete turning end of choice [regular or extra fluffy], 1 sc in each sc back to the ch-3 sp. [one point on each side of feather completed]
Row 3: (1 sc, ch 3, 1 sc) in the ch-3 sp, 1 sc in next 5 sc, complete turning end of choice [regular or extra fluffy], 1 sc in each sc back to the ch-3 sp, (1 sc, ch 3, 1 sc) in the ch-3 sp, 1 sc in next 5 sc, complete turning end of choice [regular or extra fluffy], 1 sc in each sc back to the ch-3 sp.[two points on each side of feather completed]
Row 4-5: Repeat row 3 to create 4 points on each side of the feather to complete the applique. Finish off with a sc in the ch-3 sp, and fasten off. Weave in ends.
Large Feather Applique:
Foundation chain: ch 8
Row 1: sc in 2nd ch from hk, 1 sc in next 5 sts, sc 4 in last ch, turn slightly to continue working on the bottom of the foundation chain, and sc in each st across.
Row 2: [Working in back loops only from this point forward] ch 3, and sc to the first sc on the opposite side of row 1, working clockwise, and sc in the next 4 sts. Complete turning end of choice [regular or extra fluffy], 1 sc in each sc across, and (1 sc, ch3, 1 sc) in the ch-3 sp, 1 sc in next 5 sc, complete turning end of choice [regular or extra fluffy], 1 sc in each sc back to the ch-3 sp. [one point on each side of feather completed]
Row 3: (1 sc, ch 3, 1 sc) in the ch-3 sp, 1 sc in next 5 sc, complete turning end of choice [regular or extra fluffy], 1 sc in each sc back to the ch-3 sp, (1 sc, ch 3, 1 sc) in the ch-3 sp, 1 sc in next 5 sc, complete turning end of choice [regular or extra fluffy], 1 sc in each sc back to the ch-3 sp.[two points on each side of feather completed]
Row 4-5: Repeat row 3 to create 4 points on each side of the feather.
Row 6: (1 sc, ch 3, 1 sc) in the ch-3 sp, 1 sc in next 4 sc, complete turning end of choice [regular or extra fluffy], 1 sc in each sc back to the ch-3 sp, (1 sc, ch 3, 1 sc) in the ch-3 sp, 1 sc in next 4 sc, complete turning end of choice [regular or extra fluffy], 1 sc in each sc back to the ch-3 sp.[two points on each side of feather completed]
Row 7: (1 sc, ch 3, 1 sc) in the ch-3 sp, 1 sc in next 3 sc, complete turning end of choice [regular or extra fluffy], 1 sc in each sc back to the ch-3 sp, (1 sc, ch 3, 1 sc) in the ch-3 sp, 1 sc in next 3 sc, complete turning end of choice [regular or extra fluffy], 1 sc in each sc back to the ch-3 sp.[two points on each side of feather completed]. Finish off with a sc in the ch-3 sp, and fasten off. Weave in ends.
I hope you enjoyed this pattern! Please share with your friends! Come back and share your photos of your finished projects. I love seeing the creativity of my followers as they "live the craft life".
If you are struggling with the pattern I would recommend you purchase the PDF tutorial on Etsy. It has dozens of pictures for each size and walks you through each step.
Thursday, December 15, 2016
Buttercup Bags
I was given a bagful of beautiful fabrics from a friend who was trying to decrease her fabric load (like that's ever a real problem, right?!). I had a whole bunch of my own that I had kept for years, because I was waiting for the right project to use. Well, I finally found the right project for a bunch of my fabrics!! Here it is, free Buttercup purses from the free pattern by madebyrae
I very much love how the purse turned out, and the fabric pairing was quite lovely in my opinion! Her pattern is free, and comes with fairly easy to follow instructions. I decided to follow some of the recommendations given in the comments to increase the size of the bag. I did this by printing out the original pattern to 125% using Adobe Acrobat's poster printing feature.
I found the pattern to be so simple to make, I decided to make one for all my family and a few of my friends. Check out the fabrics I chose! Let me know in the comments which one is your favorite!!!
I very much love how the purse turned out, and the fabric pairing was quite lovely in my opinion! Her pattern is free, and comes with fairly easy to follow instructions. I decided to follow some of the recommendations given in the comments to increase the size of the bag. I did this by printing out the original pattern to 125% using Adobe Acrobat's poster printing feature.
I found the pattern to be so simple to make, I decided to make one for all my family and a few of my friends. Check out the fabrics I chose! Let me know in the comments which one is your favorite!!!
Thursday, September 22, 2016
Autumn Leaves
I don't know about you, but here in Southern California we are SO excited for Fall to arrive. It has been a HOT, hot summer, with the first summer rain hitting us just a few days ago. It's been SO dry, So hot, and my family is SO OVER the heat.
Which is why to celebrate the Fall season, I found a super cute crochet pattern for some Autumn Leaves over at The Painted Hinge.
Aren't they SO adorable! I somehow happened to have all the right colors to make my collection complete!
I'm thinking about making a WHOLE bunch to make a wreath, or maybe a table runner? The possibilities are endless with such a simple design that works up so fast!
Which is why to celebrate the Fall season, I found a super cute crochet pattern for some Autumn Leaves over at The Painted Hinge.
Aren't they SO adorable! I somehow happened to have all the right colors to make my collection complete!
I'm thinking about making a WHOLE bunch to make a wreath, or maybe a table runner? The possibilities are endless with such a simple design that works up so fast!
So head on over to The Painted Hinge website to get the free pattern!
Enjoy!!!!
Labels:
applique,
Crochet,
DIY,
free pattern
Saturday, June 4, 2016
How to Hide Eyesores in your Yard
I have a relatively small yard, and we have accumulated a lot of stuff. Not just junk that we can't let go, but actually useful things that we use regularly, but lack storage space for. You know what I'm talking about. We ALWAYS need more storage space.
Well, in my back yard we have two water totes that we use to store water. We recently poured a new patio slab and had chosen the spot for them... right in plain sight!
I had to do something, so I searched on Pinterest and found a lot of solutions, most of them being wood covers. While I know those are very sturdy and can look nice, it would cost a lot for the materials and a lot of time to actually make it look nice.
What I decided to do was to build a wood frame, and choose a fabric to cover it with, kind of like you would upholster a piece of furniture or make a canvas frame. We were able to recycle the wood framing used to pour the patio (it didn't have to look nice, it was going to be covered anyway!) to help us save a lot of money, so the only expense in this project was the fabric.
Now, fabric can get very expensive, considering the beautiful prints are regularly priced at $21 PER YARD and I needed 4 1/3 yards for this project. That would have made the project $91!!! I was initially really let down by that high price, and started looking at wood prices, because duck cloth fabric, while it was cheaper, didn't look as nice.
Then I got a Joann store flyer in the mail, and saw that outdoor fabric was on sale for 50% off. I was even more excited to see that over memorial day weekend, they had a coupon for an additional 20% off, even sale priced items.
PERFECT!!
I went back to Joann's and saw that, indeed, all the beautiful designer fabrics were 50% off, and with my 20% off coupon, it brought my $91 cut of fabric to $27.30. Now, THAT was more do-able!!!
I came home and it only took me 15 minutes to get the fabric lined up and stapled to the wood, and I ABSOLUTELY LOVE LOVE LOVE the result!
I hope you've found some inspiration to save money, and be crafty to make your yard more beautiful!
Well, in my back yard we have two water totes that we use to store water. We recently poured a new patio slab and had chosen the spot for them... right in plain sight!
I had to do something, so I searched on Pinterest and found a lot of solutions, most of them being wood covers. While I know those are very sturdy and can look nice, it would cost a lot for the materials and a lot of time to actually make it look nice.
What I decided to do was to build a wood frame, and choose a fabric to cover it with, kind of like you would upholster a piece of furniture or make a canvas frame. We were able to recycle the wood framing used to pour the patio (it didn't have to look nice, it was going to be covered anyway!) to help us save a lot of money, so the only expense in this project was the fabric.
Now, fabric can get very expensive, considering the beautiful prints are regularly priced at $21 PER YARD and I needed 4 1/3 yards for this project. That would have made the project $91!!! I was initially really let down by that high price, and started looking at wood prices, because duck cloth fabric, while it was cheaper, didn't look as nice.
Then I got a Joann store flyer in the mail, and saw that outdoor fabric was on sale for 50% off. I was even more excited to see that over memorial day weekend, they had a coupon for an additional 20% off, even sale priced items.
PERFECT!!
I went back to Joann's and saw that, indeed, all the beautiful designer fabrics were 50% off, and with my 20% off coupon, it brought my $91 cut of fabric to $27.30. Now, THAT was more do-able!!!
I came home and it only took me 15 minutes to get the fabric lined up and stapled to the wood, and I ABSOLUTELY LOVE LOVE LOVE the result!
I hope you've found some inspiration to save money, and be crafty to make your yard more beautiful!
Labels:
crafts,
DIY,
Home improvement
Wednesday, February 17, 2016
DIY Hair Bow Holder
Remember way back when I made a bunch of hair bows for my daughter? If you thought that was a lot, guess what?! They multiplied!!
Now that I have two little girls living in my house I needed to come up with a new storage solution for all those hair bows. Here's why...
In times past, I tried to make one out of foam board, but the ribbon I used stretched out and the foam board quickly collapsed and didn't work for us anymore. We resorted to keeping the hair bows in a clear box storage container. We thought it was a good solution until the kids started dumping the hair bows on the floor every. single. day. I had to come up with a solution fast...
Hence, the NEW UPGRADED HAIR BOW HOLDER:
As you can see, the hair bows multiplied exponentially! I made them a beautiful rainbow assortment to match any outfit.
Here are the instructions to make your own MASTER hair bow holder.
Materials needed:
- Two 6' pieces of 1x2 lumber (to make a 2'x4' frame as shown)
- Four L corner brackets (see photo below)
- Two Sawtooth picture hangers (kits usually come with two or four)
- Wood Glue
- Saw to cut wood
- Paint of color choice
- 35 yards of ribbon (I used satin white)
- Hot glue gun
- Staple gun
Instructions:
- Cut each wood piece into a 2' and 4' piece (or whatever size you decide to make yours).
- Screw the L brackets (as shown below) to connect the two pieces.
- Use wood glue to secure the wood in the corners.
- Paint (I used two coats).
- Cut ribbon into pieces long enough to reach the back of the wood (for mine, it was 30", but PLEASE measure yourself before cutting [measure twice, cut once])
- I spaced the ribbons 3" apart (my average bow size) and attached the ribbon with hot glue.
- Staple the ribbon to reinforce.
- Attach sawtooth hangers, checking the wall for a stud to place the hanger where it will line up with a stud for secure hanging.
![]() |
| This picture sums up instructions adequately. |
Labels:
clips,
crafts,
DIY,
Instructions,
Tutorial
Subscribe to:
Posts (Atom)


.png)