

Showing posts with label kids. Show all posts
Showing posts with label kids. Show all posts
Sunday, January 20, 2019
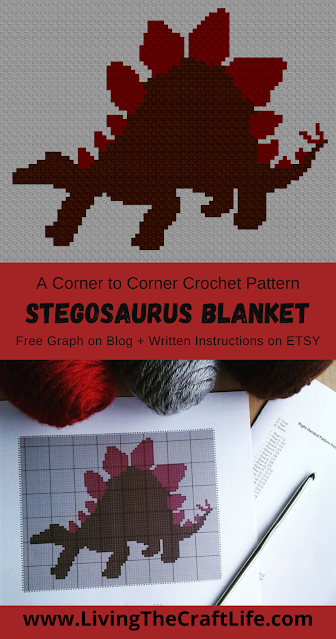
Stegosaurus C2C Blanket - FREE GRAPH
Here is the FINAL design in my DINOSAUR series! WOW, I really am pleased with my designs and I am glad to be finished. This is the monstrous Stegosaurus! I love the scales on this creature, they look so fantastic and make such a great design. Here is the Stegosaurus C2C Blanket!


Saturday, January 19, 2019
Triceratops C2C Blanket - FREE GRAPH
Here is the next design in my DINOSAUR series! I almost wanted to stop earlier, but I just have too many favorite dinosaurs with awesome silhouettes to use in designing blankets. The Triceratops is a fierce land dinosaur that is well known for its horns. Here is the Triceratops C2C Blanket!


Friday, January 18, 2019
Brontosaurus C2C Blanket - FREE GRAPH
Here is the next design in my DINOSAUR series! The mighty Brontosaurus. I don't know if you ever watched the famed LAND BEFORE TIME moves, but Little Foot was my favorite character. It probably didn't help that I am the oldest in my family, and Little Foot seemed to act more like an older sibling to the other dinosaurs. What a cute character, right?! Anyway, here is the design for the lap-sized blankets of the Brontosaurus!


Thursday, January 17, 2019
Pterodactyl C2C Blanket - FREE GRAPH
Here is the next design in my DINOSAUR series! The Pterodactyl is the most popular flying dinosaur. They're flying high in the sky! This blanket ended up being a square shape design because I just couldn't stand to crop it because it looked too lovely! Here is the design for the Pterodactyl C2C Blanket!


Wednesday, January 16, 2019
Tyrannosaurus Rex C2C Blanket - FREE GRAPH
We interrupt this program! Well, sort of! I took a short break from designing super cute, modern geometric type blankets and started a new series of designs that target boy-friendly interests, DINOSAURS. Girls can love these designs too, and you can change up the colors however you want. These are some fun lap-sized blankets of some of your more popular dinosaur friends.
Here we have, the Tyrannosaurus Rex!

Here we have, the Tyrannosaurus Rex!

Wednesday, December 19, 2018
Free Cookie Stand - Act of Service
Like most people around here, we try to do a little act of service around Christmas. We try to teach our kids to be kind, to think of others, and to be charitable. In years past, we have brought and served dinner at a homeless shelter or sung carols at a nursing home. These are common activities that our friends have done, but there were always a few others that we COULD NOT do because of the age of our children, like working at a food bank, sorting donations, or helping to clean up trails.


This year, we decided to do our own act of service, to give away christmas cookies on "Pay it forward" terms.
My husband thought it was a fantastic idea... we have done lemonade stands on a corner by our house with great success. Plus, he'd never heard of a free cookie stand! We'd try it out and see how it went.
The kids and I spent 3 hours one day making 4 different kinds of cookies, all from scratch. They all picked a recipe from our recipe book, and helped decorate the sugar cookies!
I made these cute little printable tags that we stapled right onto the bags. I wanted to have a nice message and so I wrote an invitation to pay it forward by doing an act of kindness:


We got everything packaged, prepped our posters, and drove off to the popular corner in the neighborhood.


People loved it. Not a TON of people stopped, but I think 90% of the people who drove by had a smile on their face. Even if they didn't want a sugary treat, I helped my kids know that just seeing them serve made those people happy. Love is so contagious!

Seriously, my kids loved this activity so much. We had to teach them how to DECLINE TIPS because people were trying to give them $5's, $20's, and even some $50's!!!!!!! We helped show our kids how to politely decline, that we are not in this for the money, but to share love and happiness this Christmas season!
Merry Christmas!
Monday, July 16, 2018
Flat Boutique Bows
It has been 4+ years since I made hair bows for my girls. They were starting to outgrow the ones I had made using 5/8" ribbon. I was looking for a tutorial for a nice and simple bow. I don't like ones with twisties and loopies. Just a plain. regular. bow.
And I stumbled on this video!
https://www.youtube.com/watch?v=uHRgrc-C6g8
You can get to the written out, photo tutorial here:
 http://www.modernbohemianlifestyle.com/2013/03/how-to-make-hair-bow.html
This was exactly what I was looking for! The best part, was that the ends of the ribbon do not show, so when you melt the ends, it's not a big deal if the ribbon turns black from the flame. I had that issue with my last bows and it took me FOREVER to get all those ends sealed.
With this set, I purchased the 1.5" ribbon as a lot on EBAY
I also purchased a similar lot from the same seller for 1/4" ribbon to use for the center. I saved A LOT of money vs. getting each color from the craft store. With 1 yard of ribbon, I could make two bows in each color, and that was perfect for me! The price comes out to be $.18 per bow. 18 CENTS! What a deal.
I also use alligator clips from Sally Beauty Supply. I was always disappointed in quality when I bought in bulk on ETSY. I love these clips! (they don't have them on their website, but I always find them there when I go into the store)

Anyway, I followed the tutorial and with my ribbon purchase I was able to make 50 new bows for my girls in beautiful colors!


And I stumbled on this video!
https://www.youtube.com/watch?v=uHRgrc-C6g8
You can get to the written out, photo tutorial here:
This was exactly what I was looking for! The best part, was that the ends of the ribbon do not show, so when you melt the ends, it's not a big deal if the ribbon turns black from the flame. I had that issue with my last bows and it took me FOREVER to get all those ends sealed.
With this set, I purchased the 1.5" ribbon as a lot on EBAY
I also purchased a similar lot from the same seller for 1/4" ribbon to use for the center. I saved A LOT of money vs. getting each color from the craft store. With 1 yard of ribbon, I could make two bows in each color, and that was perfect for me! The price comes out to be $.18 per bow. 18 CENTS! What a deal.
I also use alligator clips from Sally Beauty Supply. I was always disappointed in quality when I bought in bulk on ETSY. I love these clips! (they don't have them on their website, but I always find them there when I go into the store)

Anyway, I followed the tutorial and with my ribbon purchase I was able to make 50 new bows for my girls in beautiful colors!

It took me a few days to make all the bows, so I have a second photo but I think I grabbed duplicates, oh well. I promise I made 50. ;)

I just LOVE the size of these bows. They are perfect for my girls and exactly what I wanted to make. So go ahead and make some!
Thursday, November 2, 2017
Dressmaking with my Daughter
A few weeks ago I was getting some fabric at Joann's Fabric and Craft Store. They were having an amazing deal on quilting cotton fabrics and since I promised my daughter we would start quilting together, we went to go look at some fabrics.
As we were perusing through the aisles and different swatches of fabric, she found one that really caught her eye.
"Mom, I love this fabric. It would make a beautiful dress!"
Well, I had to get it for her! If she wanted to make a dress instead of a quilt, who am I to complain? It has been a while since I made a dress for my girls, so I figured we could put this one together.
We went to the pattern section to pick out a pattern. I knew that at home we only had patterns in smaller sizes, and she is about to turn 9. We flipped through the books and found out that Simplicity patterns were on sale for $.99! What great timing!!
We had picked out a couple but only one was in stock in the size we needed. So we picked that up, had our fabric cut, and went home!

First I cut out all of the pattern pieces and laid it out on the fabric. I had my daughter help trace the correct size onto the fabric, and she did most of the cutting.
I showed her how we follow the directions, starting with the stay stitching. We stitched all those pieces and started putting together the bodice. She kept getting SO excited as each piece was added and created a more finished look. I showed her how to iron everything flat.
Then, I put the sleeves on. Sleeves are one of those beasts that you just don't tackle at 8 years old. I had her watch me so she could see HOW it was done.
We started putting together the dress. I lined up the pieces and pinned them and she sewed them all together. She attached the dress to the bodice, but I had to do it one more time because her line was a little zig-zaggy. This line HAD to be straight.
We ironed the hem and I showed her how to do the first few feet. How you should hold your hands and help keep the fabric flat, how you should keep the stitches close to the edge so that it has a nice finished look. I was thoroughly impressed at how well she did this hem!

After that, all we had left was the zipper. I explained to her how that was done, and I sewed it in. After so much sewing experience, zippers don't scare me at all. I can even do it without the zipper foot and without pre-sewing the seam. I'm all about efficiency and speed!!
And this is how it all turned out! She was jumping and so excited to see how beautiful it turned out.

My daughter turns 9 this week and with how well this project went, I think we will be turning out more projects together! Do you enjoy crafting with your kids? Post a comment with a link to your projects!
Subscribe to:
Posts (Atom)