

Showing posts with label applique. Show all posts
Showing posts with label applique. Show all posts
Monday, May 27, 2019
Crochet Rainbow Shooting Star Key Chain - FREE PATTERN & TUTORIAL
So, after I made the super cute heart key chains, I just couldn't stop and had to make some stars. But I couldn't just use ANY star pattern. WHY? Because I looked all over Pinterest and couldn't find one small enough, sturdy enough, or pointy enough! Even my previously designed Shooting Star Crochet Pattern wasn't small enough. I seriously went through like 6 versions of this petite little star before I was satisfied with the design. THEN, I just couldn't help myself and I added RAINBOW TAILS and I just fell in love.


Thursday, June 15, 2017
Crochet Feather Headbands
I got a batch of photos from a photographer friend of some headbands I made from my feather crochet patterns. My friend Alicia Hubbs of Hubbs Home Photography took these fantastic photos! Check out how they turned out!


Once again, you can wrap the headband around a bun to style it up! I just loved how beautiful all these photos turned out, and I love seeing my pieces being worn and loved!
Happy Crocheting!

I made the crochet peacock feather, stitched and glue them together, and put a felt backing with room for a headband to fit through. This makes the headband interchangeable, if you're going for a specific look.

I didn't even think of doing this! Last year I put the feathers on a barrette and shared that photo on Facebook. This would have been much easier! Just wrap the headband around the bun to add a beautiful touch!

Aren't they just lovely!!

I also made some beautiful Feather Headpieces and added some felt backing with room for a headband. I actually made it possible to wear this piece in two directions, this one has the feathers sideways parallel with the headband.

This is what it looks like if you put it perpendicular to the headband. Also another beautiful look!


Happy Crocheting!
Thursday, March 9, 2017
Crochet Feather Headpiece - Free Pattern
As many of you might have figured out, I'm a huge fan of Pinterest. I love all Pinteresting things! One of the things that I have loved are these beautiful feather headpieces that babies wear. I love the colors, the style and how adorable they look:


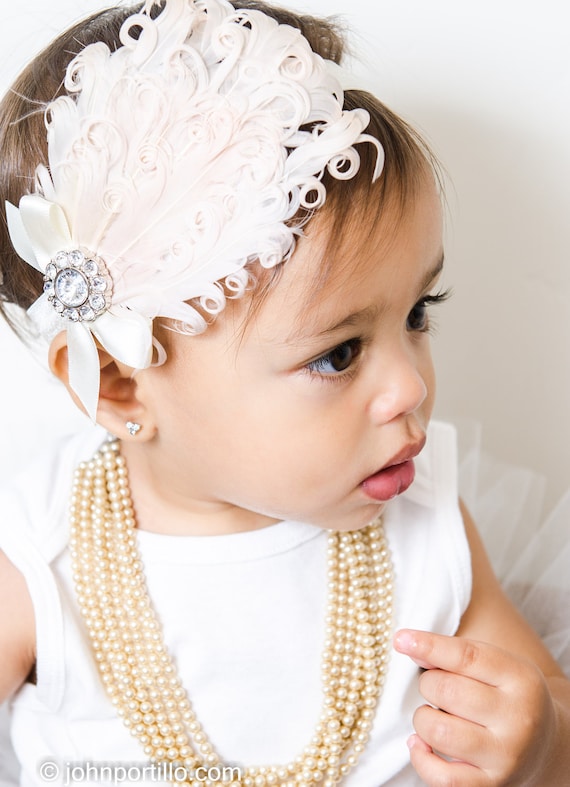

As you can see, these are SUPER SUPER cute, and I thought there had to be some cute replica crochet pattern for a nice, dainty feather looking applique, but... I could not find one! So I made up one after playing with several designs, and I decided to settle with a variation of the Irish Leaf traditional crochet pattern with some variations and some different options for sizes and "fluffiness".

This is the regular sized applique suited for children to adults depending on the style you're aiming for.

This is the large applique. This is to replicate the look of the photographs I found on Pinterest. I found a super cute medallion at Michael's Craft Store to embellish these headpieces.

This is the small applique. This was designed for newborns or young children.
In my design making, I created several options:
Small, Medium, Large sizes
Regular ends or extra fluffy ends
Materials:
Size G Hook (this is the set I use)
Worsted Weight Yarn (I use Caron’s Simply Soft Yarn: Pink, Robin's Egg, Ocean, White)
Yarn Needle
Scissors
Gauge:
Using G hook and materials listed the large feathers should measure approximately 5” tall and 2.5” wide, medium feathers should measure approximately 4” tall and 2.5” wide, small feathers should measure approximately 3” tall and 2” wide,
Here is the pattern for the different ends. Refer to these when you get to the part of the pattern where it says to complete turning end of choice [regular or extra fluffy]. If you find that this is a little too tricky, or are having trouble with this pattern, feel free to purchase my collection of tutorials for this feather headpiece on Etsy.
Regular Ends pattern: At the end of each row starting in row 2, complete the following to turn the work: ch 3, turn and work in back loops of the sc stitches.
Extra Fluffy Ends pattern: At the end of each row starting in row 2, complete the following to turn the work: ch 4, sl st in 2nd ch from hk, sc2tog in last two chs. Turn and work in back loops of the sc stitches.
.png)
Small Feather Applique:
Foundation chain: ch 6
Row 1: sc in 2nd ch from hk, 1 sc in next 3 sts, sc 4 in last ch, turn slightly to continue working on the bottom of the foundation chain, and sc in each st across.
Row 2: [Working in back loops only from this point forward] ch 3, and sc to the first sc on the opposite side of row 1, working clockwise, and sc in the next two sts. Complete turning end of choice [regular or extra fluffy], 1 sc in each sc across, and (1 sc, ch3, 1 sc) in the ch-3 sp, 1 sc in next 3 sc, complete turning end of choice [regular or extra fluffy], 1 sc in each sc back to the ch-3 sp. [one point on each side of feather completed]
Row 3: (1 sc, ch 3, 1 sc) in the ch-3 sp, 1 sc in next 3 sc, complete turning end of choice [regular or extra fluffy], 1 sc in each sc back to the ch-3 sp, (1 sc, ch 3, 1 sc) in the ch-3 sp, 1 sc in next 3 sc, complete turning end of choice [regular or extra fluffy], 1 sc in each sc back to the ch-3 sp.[two points on each side of feather completed]
Row 4-5: Repeat row 3 to create 4 points on each side of the feather to complete the applique. Finish off with a sc in the ch-3 sp, and fasten off. Weave in ends.
Medium Feather Applique:

Foundation chain: ch 8
Row 1: sc in 2nd ch from hk, 1 sc in next 5 sts, sc 4 in last ch, turn slightly to continue working on the bottom of the foundation chain, and sc in each st across.
Row 2: [Working in back loops only from this point forward] ch 3, and sc to the first sc on the opposite side of row 1, working clockwise, and sc in the next 4 sts. Complete turning end of choice [regular or extra fluffy], 1 sc in each sc across, and (1 sc, ch3, 1 sc) in the ch-3 sp, 1 sc in next 5 sc, complete turning end of choice [regular or extra fluffy], 1 sc in each sc back to the ch-3 sp. [one point on each side of feather completed]
Row 3: (1 sc, ch 3, 1 sc) in the ch-3 sp, 1 sc in next 5 sc, complete turning end of choice [regular or extra fluffy], 1 sc in each sc back to the ch-3 sp, (1 sc, ch 3, 1 sc) in the ch-3 sp, 1 sc in next 5 sc, complete turning end of choice [regular or extra fluffy], 1 sc in each sc back to the ch-3 sp.[two points on each side of feather completed]
Row 4-5: Repeat row 3 to create 4 points on each side of the feather to complete the applique. Finish off with a sc in the ch-3 sp, and fasten off. Weave in ends.
Large Feather Applique:

Foundation chain: ch 8
Row 1: sc in 2nd ch from hk, 1 sc in next 5 sts, sc 4 in last ch, turn slightly to continue working on the bottom of the foundation chain, and sc in each st across.
Row 2: [Working in back loops only from this point forward] ch 3, and sc to the first sc on the opposite side of row 1, working clockwise, and sc in the next 4 sts. Complete turning end of choice [regular or extra fluffy], 1 sc in each sc across, and (1 sc, ch3, 1 sc) in the ch-3 sp, 1 sc in next 5 sc, complete turning end of choice [regular or extra fluffy], 1 sc in each sc back to the ch-3 sp. [one point on each side of feather completed]
Row 3: (1 sc, ch 3, 1 sc) in the ch-3 sp, 1 sc in next 5 sc, complete turning end of choice [regular or extra fluffy], 1 sc in each sc back to the ch-3 sp, (1 sc, ch 3, 1 sc) in the ch-3 sp, 1 sc in next 5 sc, complete turning end of choice [regular or extra fluffy], 1 sc in each sc back to the ch-3 sp.[two points on each side of feather completed]
Row 4-5: Repeat row 3 to create 4 points on each side of the feather.
Row 6: (1 sc, ch 3, 1 sc) in the ch-3 sp, 1 sc in next 4 sc, complete turning end of choice [regular or extra fluffy], 1 sc in each sc back to the ch-3 sp, (1 sc, ch 3, 1 sc) in the ch-3 sp, 1 sc in next 4 sc, complete turning end of choice [regular or extra fluffy], 1 sc in each sc back to the ch-3 sp.[two points on each side of feather completed]
Row 7: (1 sc, ch 3, 1 sc) in the ch-3 sp, 1 sc in next 3 sc, complete turning end of choice [regular or extra fluffy], 1 sc in each sc back to the ch-3 sp, (1 sc, ch 3, 1 sc) in the ch-3 sp, 1 sc in next 3 sc, complete turning end of choice [regular or extra fluffy], 1 sc in each sc back to the ch-3 sp.[two points on each side of feather completed]. Finish off with a sc in the ch-3 sp, and fasten off. Weave in ends.
I hope you enjoyed this pattern! Please share with your friends! Come back and share your photos of your finished projects. I love seeing the creativity of my followers as they "live the craft life".
If you are struggling with the pattern I would recommend you purchase the PDF tutorial on Etsy. It has dozens of pictures for each size and walks you through each step.
Thursday, September 22, 2016
Autumn Leaves
I don't know about you, but here in Southern California we are SO excited for Fall to arrive. It has been a HOT, hot summer, with the first summer rain hitting us just a few days ago. It's been SO dry, So hot, and my family is SO OVER the heat.
Which is why to celebrate the Fall season, I found a super cute crochet pattern for some Autumn Leaves over at The Painted Hinge.

Aren't they SO adorable! I somehow happened to have all the right colors to make my collection complete!

I'm thinking about making a WHOLE bunch to make a wreath, or maybe a table runner? The possibilities are endless with such a simple design that works up so fast!

So head on over to The Painted Hinge website to get the free pattern!

Enjoy!!!!
Monday, February 10, 2014
Peacock Feather Applique - Free Pattern
**If you are looking for the Peacock Feather blanket pattern, CLICK HERE**
I love the colors in the peacock feather. I have had this idea to come up with a peacock feather pattern for a LONG time... at least 6 months. After our move and things finally settling down, I was able to sit down and come up with the pattern. I had to make MANY different versions before I was satisfied with the accuracy and neatness of the pattern. I hope you LOVE it!

*Disclosure: This post may contain affiliate links. If you purchase an item through one of the links on this site, I may receive a small percentage of that sale. See my full disclosure policy. Thank you for helping support this blog!
Materials:
Worsted Weight yarn in 4 colors
Colors I used:
A= Caron Simply Soft Passion [This color has been discontinued by Caron. Instead you can use Red Heart Soft Yarn: Grape],
B= Caron Simply Soft Brites Yarn, Blue Mint
C= Caron Simply Soft Yarn, Bone
D= Caron Simply Soft Collection Yarn, Pistachio
Size H Hook (This is the set I use: Boye 6-Piece Aluminum Crochet Hook Set )
)
Yarn Needle
Scissors
Gauge:
Using H hook and materials listed feather should be about 4” tall and 3” wide.
Special Stitches:
3-Picot: chain 3, sl st into 3rd ch from hook
Tr: Yarn over (twice), insert hook in stitch, yarn over, draw yarn through stitch, (yarn over, draw yarn through 2 loops on hook) 3 times.
Pattern:
Round 1: WITH COLOR A: In magic loop, ch 3(counts as dc) and dc 8 (9 dc total), CHANGE TO COLOR B and dc 3 more times in magic loop. Pull tail tight to close loop.
Round 2: Continuing with COLOR B, immediately sc in top of ch 3 of color A. Then 2 sc in next ch, 1 sc in next, 2 sc in next, 3 hdc in next, 2 sc in next, 1 sc in next, 2 sc in next, 1 sc in next, sl st to join and fasten off.
Attach COLOR C to same ch-sp (corner of colors A and B)
Round 3: Ch 1 and sc in same st, sc in next 2 sts, 2 sc in next, sc in next, hdc in next 2 sts, 2 hdc in next, dc in next, 2 dc in next, 2 tr in next 2 sts, 2 dc in next, dc in next, 2 hdc in next, hdc in next 2 sts, sc in next, sc in same ch as first sc, sl st to join and fasten off.
Attach COLOR D to same ch-sp
Round 4: Ch 1 and sc in same st, sc in next 2, 2 sc in next, sc in next 2, 2 sc in next, hdc in next 6 sts, 2 hdc in next, 2 dc in next, 3-picot, 2 dc in next, 2 hdc in next, hdc in next 6 sts, 2 sc in next, sc in next 2, then sc in the first ch of the row, sl st to join. Fasten off.

I love the colors in the peacock feather. I have had this idea to come up with a peacock feather pattern for a LONG time... at least 6 months. After our move and things finally settling down, I was able to sit down and come up with the pattern. I had to make MANY different versions before I was satisfied with the accuracy and neatness of the pattern. I hope you LOVE it!

*Disclosure: This post may contain affiliate links. If you purchase an item through one of the links on this site, I may receive a small percentage of that sale. See my full disclosure policy. Thank you for helping support this blog!
Materials:
Worsted Weight yarn in 4 colors
Colors I used:
A= Caron Simply Soft Passion [This color has been discontinued by Caron. Instead you can use Red Heart Soft Yarn: Grape],
B= Caron Simply Soft Brites Yarn, Blue Mint
C= Caron Simply Soft Yarn, Bone
D= Caron Simply Soft Collection Yarn, Pistachio
Size H Hook (This is the set I use: Boye 6-Piece Aluminum Crochet Hook Set
Yarn Needle
Scissors
Gauge:
Using H hook and materials listed feather should be about 4” tall and 3” wide.
Special Stitches:
3-Picot: chain 3, sl st into 3rd ch from hook
Tr: Yarn over (twice), insert hook in stitch, yarn over, draw yarn through stitch, (yarn over, draw yarn through 2 loops on hook) 3 times.
Pattern:
Round 1: WITH COLOR A: In magic loop, ch 3(counts as dc) and dc 8 (9 dc total), CHANGE TO COLOR B and dc 3 more times in magic loop. Pull tail tight to close loop.
Round 2: Continuing with COLOR B, immediately sc in top of ch 3 of color A. Then 2 sc in next ch, 1 sc in next, 2 sc in next, 3 hdc in next, 2 sc in next, 1 sc in next, 2 sc in next, 1 sc in next, sl st to join and fasten off.
Attach COLOR C to same ch-sp (corner of colors A and B)
Round 3: Ch 1 and sc in same st, sc in next 2 sts, 2 sc in next, sc in next, hdc in next 2 sts, 2 hdc in next, dc in next, 2 dc in next, 2 tr in next 2 sts, 2 dc in next, dc in next, 2 hdc in next, hdc in next 2 sts, sc in next, sc in same ch as first sc, sl st to join and fasten off.
Attach COLOR D to same ch-sp
Round 4: Ch 1 and sc in same st, sc in next 2, 2 sc in next, sc in next 2, 2 sc in next, hdc in next 6 sts, 2 hdc in next, 2 dc in next, 3-picot, 2 dc in next, 2 hdc in next, hdc in next 6 sts, 2 sc in next, sc in next 2, then sc in the first ch of the row, sl st to join. Fasten off.

Make a whole bunch and sew them together to make amazing gifts. I have seen them made into earrings, headpiece, or blankets. Post links in the comments of things you've made, I want to see!
If you are having trouble figuring out the pattern, you can purchase my 16 page step-by-step photo tutorial on etsy.
2/4/16 Edit: WELCOME DIYSMARTLY FRIENDS! I saw my pattern was linked on a page referring to a beautiful peacock feather blanket. Please notice that this pattern is for the motif only, not the blanket, nor is it the same pattern from the video posted on their page. The blanket pattern can be purchased from the person who designed the blanket. I only designed the single motif. Thank you!
Happy Crocheting!
Thursday, June 7, 2012
Baby Barefoot Sandals - Basic
These baby barefoot sandals are SO CUTE! This pattern is for a basic triangle shape that you can embellish however you want. This is the first of many baby barefoot sandals I've come up with. Enjoy!


Materials:
Light worsted weight yarn
Size F hook
Yarn needle
Notes:
Starting chain counts as a double crochet throughout pattern
I tend to crochet very tightly, so if you know you crochet loosely, you may want to use a smaller hook. You also may increase the starting chain from 2 to 3 if you need to.
Pattern:
0-6 Months
Start with a magic loop: Ch 2, dc twice into the magic loop. DO NOT TIGHTEN
Row 1: Ch 2. Dc in same st, and dc across. (4 dc)
Row 2: Ch 2. Dc in same st, and dc across (5 dc)
Row 3: Ch 2. Hdc in same st, sc in next 2 sts, hdc in last two sts. (6 sts)
Edging: Ch 1, sc down the left side of the sandal, down to the magic loop. (Sc 1, ch 5, sc1) in the magic loop. Tighten. sc back up the right side of the sandal.
Ties: When you get to the end of edging, ch 30 to form the first tie. Attach yarn to other corner and ch 30 to form second tie. Weave in all ends.
6-18 Months
Start with a magic loop: Ch 2, dc twice into the magic loop. DO NOT TIGHTEN
Row 1: Ch 2. Dc in same st, and dc across. (4 dc)
Row 2: Ch 2. Dc in same st, and dc across (5 dc)
Row 3: Ch 2. Dc in same st, and dc across (6 dc)
Row 4: Ch 2. Hdc in same st, sc in next 2 sts, hdc in last two sts. (7 dc)
Edging: Ch 1, sc down the left side of the sandal, down to the magic loop. (Sc 1, ch 6, sc1) in the magic loop. Tighten. sc back up the right side of the sandal.
Ties: When you get to the end of edging, ch 30 to form the first tie. Attach yarn to other corner and ch 30 to form second tie. Weave in all ends.
24 Months
Start with a magic loop: Ch 2, dc twice into the magic loop. DO NOT TIGHTEN
Row 1: Ch 2. Dc in same st, and dc across. (4 dc)
Row 2: Ch 2. Dc in same st, and dc across (5 dc)
Row 3: Ch 2. Dc in same st, and dc across (6 dc)
Row 4: Ch 2. Dc in same st, and dc across (7 dc)
Edging: Ch 1, sc down the left side of the sandal, down to the magic loop. (Sc 1, ch 6, sc1) in the magic loop. Tighten. sc back up the right side of the sandal.
Ties: When you get to the end of edging, ch 30 to form the first tie. Attach yarn to other corner and ch 30 to form second tie. Weave in all ends.
Embellishment flower:
Start with magic loop. Ch 3. In the magic loop *2 dc, ch 2, sl st, and repeat 5 times. Tighten magic loop and attach to sandal!
Wednesday, January 18, 2012
Sunflower Crochet Pattern
So, I'm working on a blanket for my third child arriving sometime early May. I've also got a headwrap planned made from the same pattern as the blanket once I finish! Meanwhile, I decided to post my little sunflower pattern that I use to make hair clips.
Sunflower Applique


Worsted weight yarn, in brown and yellow
Sewing needle
Gauge:
Works out to be 3 inches across with materials listed.
Pattern:
Ch 3
Row 1: dc 13 in 3rd ch from hk. Sl st with first dc and fasten off. (you can alternatively use the magic ring and DC
Row 2: Attach yellow anywhere, (ch3, Tr, ch3, sl st) in same dc. Then (sl st, ch3, tr, ch3, sl st) in each DC around. Fasten off.
Sunflower Applique


Materials:
Size H
crochet hookWorsted weight yarn, in brown and yellow
Sewing needle
Gauge:
Works out to be 3 inches across with materials listed.
Pattern:
Ch 3
Row 1: dc 13 in 3rd ch from hk. Sl st with first dc and fasten off. (you can alternatively use the magic ring and DC
Row 2: Attach yellow anywhere, (ch3, Tr, ch3, sl st) in same dc. Then (sl st, ch3, tr, ch3, sl st) in each DC around. Fasten off.
Monday, November 7, 2011
Irish Rose - Free Pattern

Materials:
Size H crochet hookWorsted Weight or Sport Weight Yarn
Sewing needle
Gauge:.
Not
Important, but using sport weight yarn the flower will end up being about 3.5
inches acrossNotes:
Pattern is worked by making a row of petals, then chaining the next row of petals behind the previous row made.
Pattern:
Small:Ch 4, Join with sl st to form ring
Round 1: Chain 3 (counts as one dc), *ch 1, dc into loop. Repeat from * 4 more times. Join with slip stitch to top of ch 3
Round 2: Ch 1, *4 dc in ch-sp, sc in dc. Repeat from * around. Join with a sl st to ch-1.
Round 3: Working in back of flower, *sc around the post, ch 3. Repeat from * around, and sl st to first sc.
Round 4: Ch 1, *5 dc in 3-ch-sp, sl st in each sc. Repeat from * around. Join with a sl st to ch-1.
Round 5: Working in back of flower again, *sc around the post, ch 4. Repeat from * around, and sl st to first sc.
Round 6: Ch 1, *6 dc in 4-ch-sp, sl st in each sc. Repeat from * around. Join with a sl st to ch-1 and fasten off.
Large:
Ch 4, Join with sl st to form ring
Round 1: Chain 3 (counts as one dc), *ch 1, dc into loop. Repeat from * 4 more times. Join with slip stitch to top of ch 3
Round 2: Ch 1, *4 dc in ch-sp, sc in dc. Repeat from * around. Join with a sl st to ch-1.
Round 3: Working in back of flower, *sc around the post, ch 4. Repeat from * around, and sl st to first sc.
Round 4: Ch 1, *6 dc in 4-ch-sp, sl st in each sc. Repeat from * around. Join with a sl st to ch-1.
Round 5: Working in back of flower again, *sc around the post, ch 4. Repeat from * around, and sl st to first sc.
Round 6: Ch 1, *8 dc in 5-ch-sp, sl st in each sc. Repeat from * around. Join with a sl st to ch-1 and fasten off.
Monday, October 24, 2011
Eye Appliques - Free Pattern
 Fun little eyes to put on your amigurumi, hats, or whatever project needs them! For example, I use the Medium Eye on my Owl Hats.
Materials:
Worsted Weight yarn in white and an eye color of your choice
Size H Crochet hook
Yarn Needle
Gauge:
Not essential, but with materials listed it will end up being about the size listed.Pattern:
Smallest Eye (1.5”)
In Eye ColorCh 2
Row 1: Sc 5 in 2nd ch from hk. Fasten off. (you should have 6 loops around circle)
Row 2: Attach white. Ch 2, hdc in same st. 2 hdc in each stitch around. Fasten off
Small Eye (1.75”)
In Eye ColorCh 3
Row 1: Hdc 7 in 3rd ch from hk. Fasten off. (you should have 8 loops around circle)
Row 2: Attach white. Ch 2, hdc in same st. 2 hdc in each stitch around. Fasten off
Medium Eye (2”)
In Eye ColorCh 3
Row 1: Hdc 7 in 3rd ch from hk. Fasten off. (you should have 8 loops around circle)
Row 2: Attach white. Ch 3, dc in same st. 2 dc in each stitch around. Fasten off
Large Eye (2.75”)
In Eye ColorCh 3
Row 1: Dc 11 in 3rd ch from hk. Fasten off. (you should have 12 loops around circle)
Row 2: Attach white. Ch 2, hdc in same st. 2 hdc in each stitch around. Fasten off
Friday, November 19, 2010
Crochet Watermelon Applique
I've been revisiting some of my older patterns and sprucing things up! This is my super cute MINI WATERMELON crochet applique! There are so many possibilities for this cute applique... add it to your purse, make a keychain, make earrings, make hair clips.... the possibilities are endless!!

Materials:
Size 7 crochet hook (This is the first set I ever owned!)Crochet Thread size 10 (This is a great brand for cotton thread!)
Sewing needle (Blunt ended needles are a MUST HAVE!)
OR
Size 4 Crochet Hook (I highly recommend this set!)
Embroidery Floss (This is a great deal on bulk floss!)
Gauge:
Works out to be about 1 inch across with size 10 thread and size 7 hook, or 1.25 inches across if you use Embroidery Floss and a Size 4 hook.
Notes:
You can either attach the new color using the loop on hook, and ch 1 and turn. Or you can start with a slip knot on the hook and attach the yarn with the stitches indicated. Personally, I used the first method of attaching and chaining 1.
Pattern:
Row 1: Ch 4, 11 tr in 4th ch from hook
Row 2: Attach white thread, sc in next 2 ch, 2 sc in next, repeat across
Row 3: Attach green thread, 2 sc in each stitch across
Fasten off!
So easy to make!
 |
| Original photo from when I first published this post in 2010 |
Wednesday, September 8, 2010
Little Crochet Bird

Little birds are always cute. Here you can work one up in less than 10 minutes!
Bird:
Ch 4 and sl st to form ring.Row 1: ch 2, dc 14 into loop. sl st with top of ch 2
Row 2: ch 1, 2 sc in next 7 chs, (hdc, dc) in next ch, (tr, ch 3, sl st w/ 3rd ch from hook, ch 3) and sl st in next ch, sl st in next 2 ch, (sl st, ch 3, tr) in next ch, (2 tr, ch 3 and sl st with 3rd ch from hook, ch 2, sl st) in next ch.
Fasten off.
Part in RED is optional- it makes a beak the same color. You may instead, follow the instructions below to attach a different colored beak.
Wing:
Ch 4. 3 Tr in 4th ch from hook (forms loop), ch 3, sl st with 3rd ch from hook. Ch 3, sl st in loop.
Tighten strings and attach to bird. Wing is adjustable to look like it is flying, or resting!
Beak:
Attach string to bird's face. Ch 3, sl st in same ch. Fasten off.
Friday, September 3, 2010
Tropical Flower Applique

I love, love, LOVE this flower. I came up with the pattern after looking at several items on Etsy. It's a pretty straight-forward pattern, with triple crochets.
They work out to be about 1.75 inches using size 10 thread and size 8 hook.
Ch 6. Sl st together to form ring
Row 1: Ch 3, 2 tr, ch 3, *3 tr, ch 3. Repeat from * 3 more times. Join with SC to top of CH 3.
Row 2: *Sc in next st (middle TR), (2 dc, 3 tr, {ch 3, sl st with first ch of ch3}, 3 tr, 2 dc) in the 3 ch sp; sc in next ch. Repeat from * 4 more times.
Finishing off: Instead of a sc in the very last ch, sl st, and fasten off.
Thursday, September 2, 2010
Crochet Cherry Applique

Little cherries are so cute, and are very versatile when it comes to appliques or embellishments. They can go on bags, hats, and just about anything for the kitchen. They are so easy to make- the putting together can be a little challenging, but they turn out so cute!
Works out to be 1.25 inches wide, 1.75 inches tall using size 10 crochet thread and a size 7 hook.
Cherry:
With RED yarn
Using the Magic Ring, 12 DC. Fasten off.
Stem:
Attach Green yarn to any CH on cherry. Ch 10 (or to desired length), sl st in 2nd ch from hook, and each ch back to the cherry. Fasten off.
Leaf:
ch 9, sl st in 2nd ch from hook, *sc in next ch, hdc in next ch, 2 dc in next two ch, hdc in next ch, sc in next ch, sl st in next ch. Ch 1 Work around and repeat from *. Fasten off
Make two of each piece and stitch them all together!
Subscribe to:
Posts (Atom)